How To Stop Fake Emails
Introduction – Stop Fake Emails
Adversaries commonly conduct social engineering attacks against organisations using fake emails. For example, by modifying the sender’s address or other parts of an email header to appear as though the email originated from a different source. This is a common method used by adversaries to increase the likelihood of compromising systems as they know that users are more likely to open a malicious attachment from yourorganisation.com.au than from hacker.net.
Organisations can reduce the likelihood of their domains being used to support fake emails by implementing Sender Policy Framework (SPF) and Domain-based Message Authentication, Reporting and Conformance (DMARC) records in their Domain Name System (DNS) configuration. Using DMARC with DomainKeys Identified Mail (DKIM) to sign emails provides further safety against fake emails.
SPF and DMARC records are publicly visible indicators of good cyber hygiene. The public can query a DNS server and see whether an organisation has SPF and/or DMARC protection. DKIM records are attached to outgoing emails and their presence (or lack thereof) is also visible to any external party you email.
This publication provides information on how SPF, DKIM and DMARC work, as well as advice for security practitioners and information technology managers within organisations on how they should configure their systems to prevent their domains from being used as the source of fake emails.
How SPF, DKIM and DMARC work
Sender Policy Framework
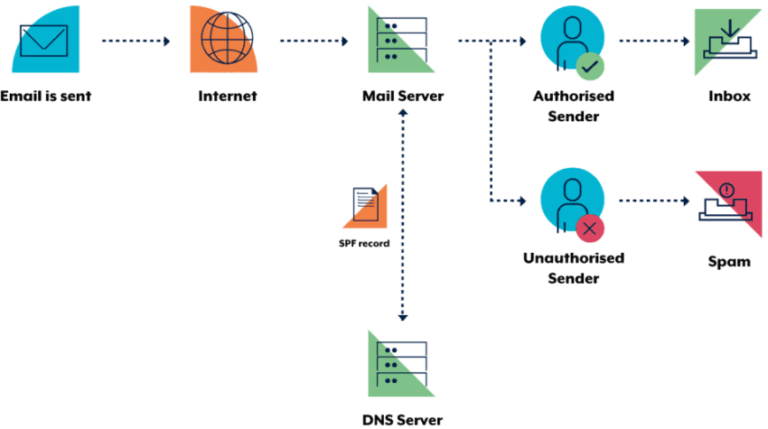
SPF is an email verification system designed to detect fake emails. As a sender, a domain owner publishes SPF records in DNS to indicate which mail servers are allowed to send emails for their domains.
When an SPF enabled server receives email, it verifies the sending server’s identity against the published SPF record. If the sending server is not listed as an authorised sender in the SPF record, verification will fail. The following diagram illustrates this process.
DomainKeys Identified Mail
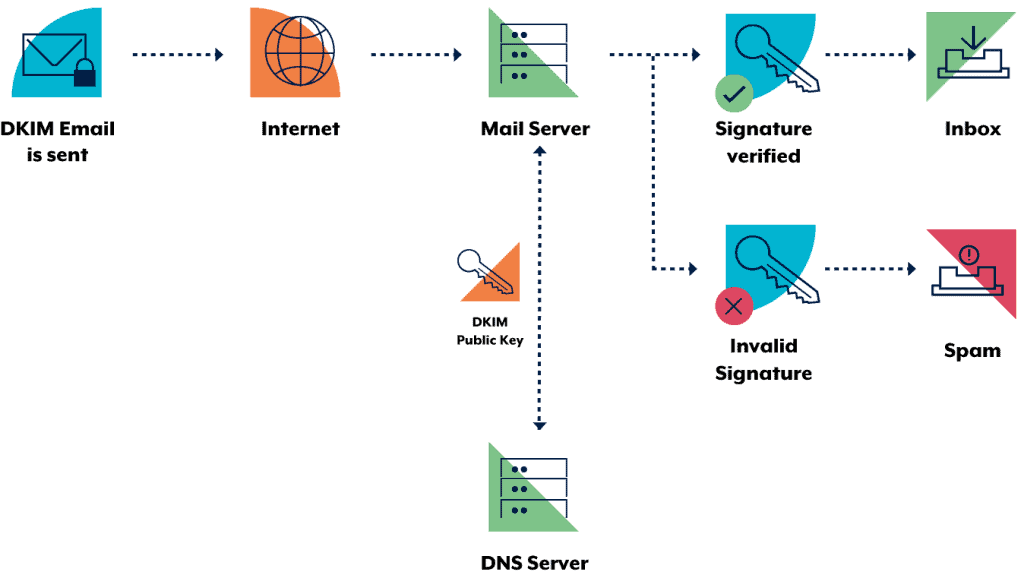
The DKIM standard uses public key cryptography and DNS to allow sending mail servers to sign outgoing emails, and receiving mail servers to verify those signatures. To facilitate this, domain owners generate a public-private key pair. The public key from this pair is then published in DNS and the sending mail server is configured to sign emails using the corresponding private key.
Using the sending organisation’s public key (retrieved from DNS), a receiver can verify the digital signature attached to an email. The following diagram illustrates this process.
Domain-based Message Authentication, Reporting and Conformance
DMARC enables domain owners to advise recipient mail servers of policy decisions that should be made when handling inbound emails claiming to come from the owner’s domain. Specifically, domain owners can request that recipients:
- allow, quarantine or reject emails that fail SPF and/or DKIM verification
- collect statistics and notify the domain owner of emails falsely claiming to be from their domain
- notify the domain owner how many emails are passing and failing email authentication checks
- send the domain owner data extracted from a failed email, such as header information and web addresses from the email body.
Notifications and statistics resulting from DMARC are sent as aggregate reports and forensic reports:
- aggregate reports provide regular high level information about emails, such as which Internet Protocol (IP) address they come from and if they failed SPF and DKIM verification
- forensic reports are sent in real time and provide detailed information on why a particular email failed verification, along with content such as email headers, attachments and web addresses in the body of the email.
Like SPF and DKIM, DMARC is enabled when the domain owner publishes information in their DNS record. When a recipient mail server receives an email, it queries the DMARC record of the domain the email claims to come from using DNS.
DMARC relies on SPF and DKIM to be effective. The following diagram illustrates this process.
It should be noted that receiving mail servers need to be configured to honour SPF, DKIM and DMARC for the protections to be in effect.
How to implement SPF, DKIM and DMARC
Sender Policy Framework
Identify outgoing mail servers
Identify your organisation’s authorised mail servers, including your primary and backup outgoing mail servers. You may also need to include your web servers if they send emails directly. Also identify other entities who send emails on behalf of your organisation and use your domain as the email source. For example, advertising or recruitment firms and newsletters.
Construct your SPF record
SPF records are specified as text (TXT) records in DNS. An example of an SPF record might be v=spf1 a mx a:<domain/host> ip4: -all where:
- v=spf1 defines the version of SPF being used
- a, mx, a:<domain/host> and ip4: are examples of how to specify which server are authorised to send email
- -all specifies a hard fail directing receivers to drop emails sent from your domain if the sending server is not authorised.
It is important to note that you must set a separate record for each subdomain as subdomains do not inherit the SPF record of their top level domain.
To avoid creating a unique record for each subdomain, you can redirect the record lookup to another SPF record (the top level domain record or a special record for subdomains would be the simplest solution).
Identify domains that do not send email
Organisations should explicitly state if a domain does not send emails by specifying v=spf1 -all in the SPF record for those domains. This advises receiving mail servers that there are no authorised sending mail servers for the specified domain, and hence, any emails claiming to be from that domain should be rejected.
Protect non-existent subdomains
Some mail servers do not check that the domain which emails claim to come from actually exists, so proactive protection must be applied to non-existent subdomains. For example, adversaries could send emails from 123.yourorganisation.com.au or shareholders.yourorganisation.com.au even if the subdomains 123 and shareholders did not exist. Protection of non-existent subdomains is provided using a wildcard DNS TXT record.
Warn your users
Ensure users are told of the new SPF email policy so they can report any implementation issues which may arise. It should be noted that once SPF is implemented, emails sent from non-authorised servers, such as those outside the corporate network, may no longer reach their intended destinations. If users are required to send emails while away from the corporate network environment, then provisions should be made for authenticated remote access to an authorised mail server specified in the SPF entry.
Test your SPF record
Testing your SPF record will ensure that emails are processed correctly. Tools such as MX Lookup [1] can help assess the correctness of SPF records before finalising them. A hard fail policy (i.e. -all) is the preferred approach for SPF. However, while testing, you may wish to use a soft fail policy. This is done by specifying ~all instead of -all in the SPF record. By combining this with DMARC reporting, you can be made aware of potential issues before implementing a hard fail policy.
It should be noted that older methods of forwarding emails (e.g. .forward files on UNIX-based systems) can fail SPF checks if not treated correctly. If this describes your operating arrangement, you may wish to convert forwarded emails to re-mailed emails using Sender Rewriting Scheme (SRS).
Deploy your SPF record
When you have an SPF record you intend to deploy, ensure the Time to Live (TTL) is set low (e.g. 5 minutes). Setting the TTL low will allow you to correct or rollback your SPF record quickly in the case of an issue.
Monitor the success of the SPF record after deployment
When you implement a new SPF record it will take some time before mail servers on the internet recognise it. If you have an existing SPF record this time will be defined by the TTL associated with this record. If you don’t have an existing SPF record, you should review your domain’s ‘start of authority’ to determine the negative cache TTL value, sometimes referred to as ‘minimum TTL’. This number, in seconds, is the maximum time it should take email servers on the internet to detect your new SPF record – a typical default value is 7,200 seconds (i.e. two hours). After you have implemented an SPF record, you should monitor your mail server up to the TTL time and confirm that email delivery is continuing normally. If your SPF configuration is incorrect recipient email servers will begin to reject your email.
Incorporate SPF into the change management process and associated procedures
SPF records will need to be updated when new email sending servers are deployed, DNS entries are added, and DNS entries or IP addresses of sending mail servers change. In such cases, respectively, new servers will need to be added to the SPF record of the associated domains, new SPF records will be required (including wildcard SPF records), and the SPF record of all associated domains will need to be reviewed. It is important that your procedures account for these changes as part of your organisation’s change management process.
Additional resources
For additional information on SPF, see the SPF standard [2] and its update [3].
For additional information on how to setup SPF, see Microsoft’s Set up SPF in Office 365 to help prevent spoofing publication [4] and Google’s Help prevent email spoofing with SPF records publication [5].
For additional information on SRS, see Microsoft’s Sender Rewriting Scheme (SRS) in Office 365 publication [6].
DomainKeys Identified Mail
Decide what sections of your email you want to sign
The more sections of an email you sign, the more protected you are from adversaries sending fake emails that appear to come from you. At least the body and the following headers of emails should be signed:
- to
- cc
- date
- from
- subject
- sender
- reply-to
- references
- mime-version
- content-type
- references
- in-reply-to
- return-path
- content-disposition
- content-transfer-encoding
If supported by your email software, it is also important to sign headers one more time than the number of times they occur. A detailed analysis of why this is important can be found in the Breaking DKIM – on Purpose and by Chance publication [7].
Decide when to sign your outgoing email
DKIM verification may fail if signed sections of emails are changed during delivery. This can happen without the interference of adversaries. For example, if you sign an email but then attach a legal disclaimer, you will likely invalidate the DKIM signature as the content of the email has now changed.
To ensure the DKIM signatures on outgoing emails are not invalidated, you need to understand your email infrastructure and when the content of emails is changed.
A good way to begin a DKIM rollout would be to sign emails as they leave the email gateway and if you run into issues, see how you can modify this approach to accommodate your email setup. In general, signing emails at the last stage before they leave the infrastructure under your control reduces the chance of unintended changes.
Generate your public and private keys for DKIM
You will need to find a tool to generate a public/private key pair. The tool of choice will depend on your organisation, its key management plan and operating system. In the absence of organisation specific tools, there are tools such as PuTTYgen [8] for Microsoft Windows or ssh-keygen for Linux and macOS. Information on how to use these tools is available in Oracle’s Generating a Secure Shell (SSH) Public/Private Key Pair publication [9].
After creating the public/private key pair, make sure you protect your private key in accordance with your organisation’s key management plan. If your private key becomes public, any adversary will be able to sign emails as yourself.
You may want to generate multiple public/private key pairs if you want different parts of your organisation to have the ability to independently sign emails.
Publish your public key in your DNS record
Public keys for DKIM are published in DNS TXT records. You will need to include a different TXT record for each private/public key pair you want to use by using a selector. You will then need to configure your mail server to specify the correct selector when sending emails.
Make sure you put the public keys at ._domainkey.yourorganisation.com.au where selector must be different for every public/private key pair. For example you might have brisbane._domainkey.yourorganisation.com.au and melbourne._domainkey.yourorganisation.com.au for different offices in your organisation.
The content of the record itself will be similar to v=DKIM1; k=rsa; p=.
Identify domains that do not send email
Organisations should explicitly state if a domain does not send emails by specifying v=DKIM1; p= in the DKIM record for those domains. This advises receiving mail servers that there are no valid public keys for that domain and any emails claiming to be from it should be rejected. This should be done for each domain and subdomain using wildcard DKIM records.
Warn your users
As for SPF, notify users of the change so they are aware and can communicate any unexpected change in email behaviour.
Develop and test your mail server configuration
Using a test environment, identify how your mail server implements DKIM and test your configuration as thoroughly as possible prior to implementation.
Configure your mail server to attach DKIM records to its headers
A phased implementation approach is recommended if your infrastructure layout allows. Immediately after deployment, test that emails are being signed correctly by sending emails to external email accounts and reviewing email headers.
Monitor after deployment
After DKIM has been added, and if you have already configured DMARC, you can use DMARC email reports to verify how many emails are failing DKIM checks.
Additional resources
For additional information on DKIM, see the DKIM website [10], the DKIM standard [11] and its two updates [12] [13].
For additional information on how to setup DKIM, see Microsoft’s Use DKIM to validate outbound email sent you’re your custom domain in Office 365 publication [14] and Google’s Enhance security for outgoing email (DKIM) publication [15].
Domain-based Message Authentication, Reporting and Conformance
DMARC is implemented by publishing a policy as a TXT record in DNS and is hierarchical (e.g. a policy published for organisation.com.au will apply to sub.domain.organisation.com.au unless a different policy is explicitly defined for the subdomain). This is useful as organisations may be able to specify a smaller number of high level DMARC records for wider coverage. Care should be taken to configure explicit subdomain DMARC records where you do not want the subdomains to inherit the top level domain’s DMARC record.
When implementing DMARC, it is advisable to first implement it in monitoring mode, followed by quarantine mode and finally reject mode as the implementation maturity level increases.
Monitoring mode
You can start your DMARC implementation with a simple monitoring policy for your domain which requests that DMARC capable mail servers send you statistics about emails they see using your domain. You can do this even before you’ve implemented SPF or DKIM in your messaging infrastructure, though until it is in place you won’t be able to move beyond this step.
As you introduce SPF and DKIM, reports will provide the number and IP addresses of emails that pass these checks, and those that don’t. You can then see how much of your legitimate traffic is passing SPF and DKIM checks, and troubleshoot any problems with your SPF or DKIM configuration.
You will also begin to see how many fraudulent emails are being sent, and from where. At this point you should put in place a capability to review reports from recipient mail servers sent in accordance with DMARC configuration to identify malicious activity.
An example of such a DMARC record is v=DMARC1; pct=50; p=none; sp=quarantine; ruf=mailto:authfail@yourorganisation.com.au; rua=mailto:aggrep@yourorganisation.com.au where:
- v=DMARC1 defines the version of DMARC being used
- pct=50 specifies the percentage of emails subjected to filtering
- p=none specifies the policy for your organisation domain
- sp=quarantine specifies the policy for all organisation subdomains
- ruf=mailto:authfail@yourorganisation.com.au states the email address to which forensic reports should be sent
- rua=mailto:aggrep@yourorganisation.com.au states the email address to which aggregate reports should be sent.
Note, if you plan to send your DMARC reports to a domain that is not the domain for which the DNS record exists, you will need to include a special record in the receiving domains DNS record.
Quarantine mode
When you believe that all, or most of, your email traffic is protected by SPF or DKIM, you can implement a quarantine policy. This will result in DMARC enabled servers marking emails from your domain that fail verification as spam.
Even if you request that only a small percentage of your email traffic have a quarantine policy applied, you will still get the full statistical reports that show what is happening with your emails. Eventually, as implementation problems are resolved, you can gradually increase your implementation to 100 percent.
Reject mode
Following testing using a quarantine policy, implement a reject policy. This will result in DMARC enabled servers rejecting emails that fail SPF and DKIM verification. Again, you can request that this policy only be applied to a small percentage of your emails (with the remaining percentage being quarantined) and monitor the results through reports. The same gradual increase to 100 percent can be implemented based on reports and feedback from users.
Additional resources
For additional information on DMARC, see the DMARC website [16] and the DMARC standard [17]. The DMARC website also identifies common mistakes with DMARC records [18] and includes answers to frequently asked questions [19].
For additional information and assistance in generating a DMARC record, see the Global Cyber Alliance [20].
For additional information on how to setup DMARC, see Microsoft’s Use DMARC to validate email in Office 365 publication [21] and Google’s Enhance security for forged spam (DMARC) publication [22].
Detailed examples and edge cases
Records for SPF, DKIM and DMARC are published as follows.
Protocol | Record Type | Record Name |
SPF | TXT | |
DKIM | TXT | ._domainkey. |
DMARC | TXT | _dmarc. |
Analysis of common SPF syntax
Using an example of v=spf1 a mx a:<domain/host> ip4: -all:
- mx specifies that recipients should accept the servers identified by the mail exchanger (MX) record for your domain/host
- a specifies that recipients should accept the server identified by the A record for your domain/host
- a:<domain/host>, ip4: are examples of specifying other hosts that can send email, either by an A record or an IP address
- -all specifies a hard fail directing receivers to drop emails sent from your domain if the sending server is not authorised.
Note, the +all and ?all flags should never be used as they could allow any mail server to send emails from your organisation. Further, be careful when using include or redirect. If you include or redirect a domain whose SPF record’s syntax is incorrect, mail servers will return an error when validating emails against your SPF record.
Redirecting subdomains SPF records to save time
An individual SPF record must be set for each domain and subdomain. However, to avoid creating a unique SPF record for each subdomain, you can redirect them to your top level domain. For example, you can set all subdomain records to be v=spf1 redirect=yourorganisation.com.au. This configuration will mean that all subdomains will use the SPF record of their parent domain, yourorganisation.com.au. This is effective if, for example, all emails from subdomains pass through a centralised email relay.
Alternatively, you could redirect to a special subdomain if you want all subdomains to have a specific SPF record that is different from that of the top level domain. For example, you could set all subdomain records as v=spf1 redirect=spf.yourorganisation.com.au which would mean that all subdomains use the SPF record at spf.yourorganisation.com.au and you only need to maintain one actual SPF record for all subdomains.
Using wildcard SPF records to protect non-existent domains
An additional wildcard SPF record (*.) is required for every domain and subdomain to prevent adversaries sending emails claiming to be from a non-existent subdomain. Examples of wildcard SPF records follow.
Examples of what your DNS records may look like for different scenarios
Domains that don’t send email
yourorganisation.com.au. TXT “v=spf1 –all”
*.yourorganisation.com.au. TXT “v=spf1 –all”
*._domainkey.yourorganisation.com.au. TXT “v=DKIM1; p=”
_dmarc.yourorganisation.com.au. TXT “v=DMARC1; p=reject; ruf=mailto:authfail@yourorganisation.com.au; rua=mailto:aggrep@yourorganisation.com.au”
Even though this domain doesn’t send email, the SPF and DKIM records are needed to prevent adversaries sending emails pretending to be you and the DMARC record is needed so you are notified when this happens.
The email accounts specified in the DMARC record, authfail@yourorganisation.com.au and aggrep@yourorganisation.com.au, are examples of email addresses you could use to receive DMARC reports.
Domains which send email
yourorganisation.com.au. TXT “v=spf1 a mx a:domain1.com.au ip4:1.2.3.4 –all”
*.yourorganisation.com.au. TXT “v=spf1 –all”
selector1._domainkey.yourorganisation.com.au. TXT “v=DKIM1; k=rsa; p=MIGfMA0GCSqGSIb3DQEBAQUAA4GNADCBiQKBgQC3QEKyU1fSma0axspqYK5iAj+54lsAg4qRRCnpKK68hawSd8zpsDz77ntGCR0X2mHVvkf0WEOIqaspaG/A5IGxieiWer+wBX8lW2tE4NHTE0PLhHqL0uD2sif2pKoPR3Wr6n/rbiihGYCIzvuY4/U5GigNUGls/QUbCPRyzho30wIDAQAB”
_dmarc.yourorganisation.com.au. TXT “v=DMARC1; p=reject; ruf=mailto:authfail@yourorganisation.com.au; rua=mailto:aggrep@yourorganisation.com.au”
Subdomains which don’t send email
subdomain.yourorganisation.com.au. IN TXT “v=spf1 –all”
*.subdomain.yourorganisation.com.au. IN TXT “v=spf1 –all”
*._domainkey.subdomain.yourorganisation.com.au. TXT “v=DKIM1; p=”
Subdomains which send email
subdomain.yourorganisation.com.au. IN TXT “v=spf1 redirect=yourorganisation.com.au”
*.subdomain.yourorganisation.com.au. IN TXT “v=spf1 –all”
selector1._domainkey.subdomain.yourorganisation.com.au. TXT “v=DKIM1; k=rsa; p=MIGfMA0GCSqGSIb3DQEBAQUAA4GNADCBiQKBgQC3QEKyU1fSma0axspqYK5iAj+54lsAg4qRRCnpKK68hawSd8zpsDz77ntGCR0X2mHVvkf0WEOIqaspaG/A5IGxieiWer+wBX8lW2tE4NHTE0PLhHqL0uD2sif2pKoPR3Wr6n/rbiihGYCIzvuY4/U5GigNUGls/QUbCPRyzho30wIDAQAB”
In these examples, there are no DMARC records published. For the sake of this example we are assuming the parent domain has published a DMARC policy which we are accepting through inheritance.
Example of DKIM signature header in an email
DKIM-Signature a=rsa-sha256; d=yourorganisation.com.au; s=selector; c=relaxed/simple; q=dns/txt; t=1117574938; x=1118006938; h=from:from:to:to:cc:cc:subject:subject:date:date:sender:sender:content-type: content-type:content-transfer-encoding:content-transfer-encoding:content-disposition:content-disposition:mime-version:mime-version:reply-to:reply-to:in-reply-to:in-reply-to:references:references; bh=MTIzNDU2Nzg5MDEyMzQ1Njc4OTAxMjM0NTY3ODkwMTI=; b=dzdVyOfAKCdLXdJOc9G2q8LoXSlEniSbav+yuU4zGeeruD00lszZVoG4ZHRNiYzR
Further examples, as well as advice on what to do with domains you aren’t currently using, can be found in the M3AAWG Protecting Parked Domains Best Common Practices publication [23].
Edge cases
Hosting services on a shared IP address
Hosting your mail server on a shared IP address may allow others, who have a service on the same IP address, to send emails as your domain. This is possible because SPF authentication resolves to IP addresses. For example, your mail server is acorp.com with an IP address of 1.1.1.1 and you authorise emails to be sent from this domain with an SPF record of v=spf1 mx –all (assuming that your mx record resolves to 1.1.1.1). If bcorp.com also hosts a service at 1.1.1.1, then bcorp.com can send emails claiming to be acorp.com as they have the same IP address and SPF resolves and authenticates on IP addresses.
This is a factor organisations should consider before authorising email services that operate on shared infrastructure.
Publishing SPF records for HELO names used by your mail servers
The SPF standard recommends that both the HELO name specified by the connecting mail server and MAIL FROM field of the envelope undergo an SPF authorisation check. If you are using a different domain for the HELO name and in the MAIL FROM field of the SMTP connection, you will need to construct SPF records to authorise both the server you are using in the HELO field and the address you are using in the MAIL FROM field. Two example situations are discussed below.
Emails are being sent from recruitment@acorp.com.au but being relayed by your email list service provider’s server mail.bcorp.com.au.
- to authorise the MAIL FROM: acorp.com.au. IN TXT “v=spf1 mx a:mail.bcorp.com.au –all”
- to authorise the sending server: mail.bcorp.com.au. IN TXT “v=spf1 a –all”.
Note, if you publish a nil SPF record for the hostname of your email relay some SPF filters will reject it.
Emails are being sent from somebody@acorp.com.au via mail.bcorp.com.au.
In this case, publishing the below SPF entries, will result in some SPF filters rejecting email due to the HELO hostname lookup:
- acorp.com.au. IN TXT “v=spf1 mx a:mail.bcorp.com.au –all”
- mail.bcorp.com.au. IN TXT “v=spf1 –all”.
A correct configuration could be achieved by using mail.bcorp.com.au. IN TXT “v=spf1 a –all”.
Treatment of CNAME records
Canonical Name (CNAME) records are a common DNS technique used to enable transparent redirection to an alternate domain name. They are frequently used by organisations to redirect requests for services to a third party service provider (e.g. a public cloud). While this is an effective technique, organisations need to be aware that a CNAME record effectively delegates all DNS calls for the target domain to the domain specified in the answer section. For example, if you have yourorganisation.com.au CNAME serviceprovider.com.au then requests for the SPF, DKIM and DMARC records for www.yourorganisation.com.au will be answered as if directed to serviceprovider.com.au. Hence, if a CNAME record is used in your DNS record to redirect requests to an alternate domain, then it will not be possible for you to specify SPF, DKIM and DMARC records. This is a risk that needs to be accepted when deciding to delegate DNS records in this manner. Appropriate SPF, DKIM and DMARC records can be discussed with your service provider, and can be specified in contracts when engaging with such services.
Common mistakes in using wildcards DNS entries
Wildcard DNS entries are a useful technique for synthesizing DNS results for non-existent hosts. However, wildcard DNS entries do not always behave as might be expected and implementations vary between DNS server implementations. For example, in some implementations a resource record, such as an MX or TXT record for *.yourorganisation.com.au, will match against all existent and non-existent hosts and subdomains. In other implementations, it will only match against non-existent hosts and subdomains.
The correct behaviour is that a wildcard resource record only matches against non-existent sub domains and hosts. This document is based on this correct behaviour.
An additional wildcard SPF record (*.) is required for every domain and subdomain to prevent adversaries sending emails claiming to be from a non-existent subdomain.
Further information on DNS wildcard behaviour can be found in Wikipedia’s Wildcard DNS record publication [24].
Sending DMARC reports to a different domain
If your domain is yourorganisation.com.au and you want to send your reports to report.com.au, then the recipient domain (report.com.au) needs to have a TXT DNS record at yourorganisation.com.au._report._dmarc.report.com which has content v=DMARC1.
If you are sending all your reports to the same domain, you may want to implement a wildcard DMARC record so you can receive reports from anyone who wants to send them to you. A wildcard record would be *._report._dmarc.report.com which specifies v=DMARC1. However, doing this allows attacks where adversaries can send huge amounts of DMARC reports in an attempt to cripple your infrastructure.
Further information
The Australian Government Information Security Manual (ISM) assists in the protection of information that is processed, stored or communicated by organisations’ systems. The Guidelines for Email Management in particular contain additional recommendations on the implementation of SPF, DKIM and DMARC. It can be found at https://www.cyber.gov.au/acsc/view-all-content/ism.
The Strategies to Mitigate Cyber Security Incidents complements the advice in the ISM. The complete list of strategies can be found at https://www.cyber.gov.au/acsc/view-all-content/publications/strategies-mitigate-cyber-security-incidents.